Navigation
View Editor is divided into a navigation bar (red) and a content display area. The content area is divded into three sections, the left pane or “tree-view” which displays the tree of the current context. The center pane shows the current content and the right pane hosts a set of tools to further inspect and dive into the model content.
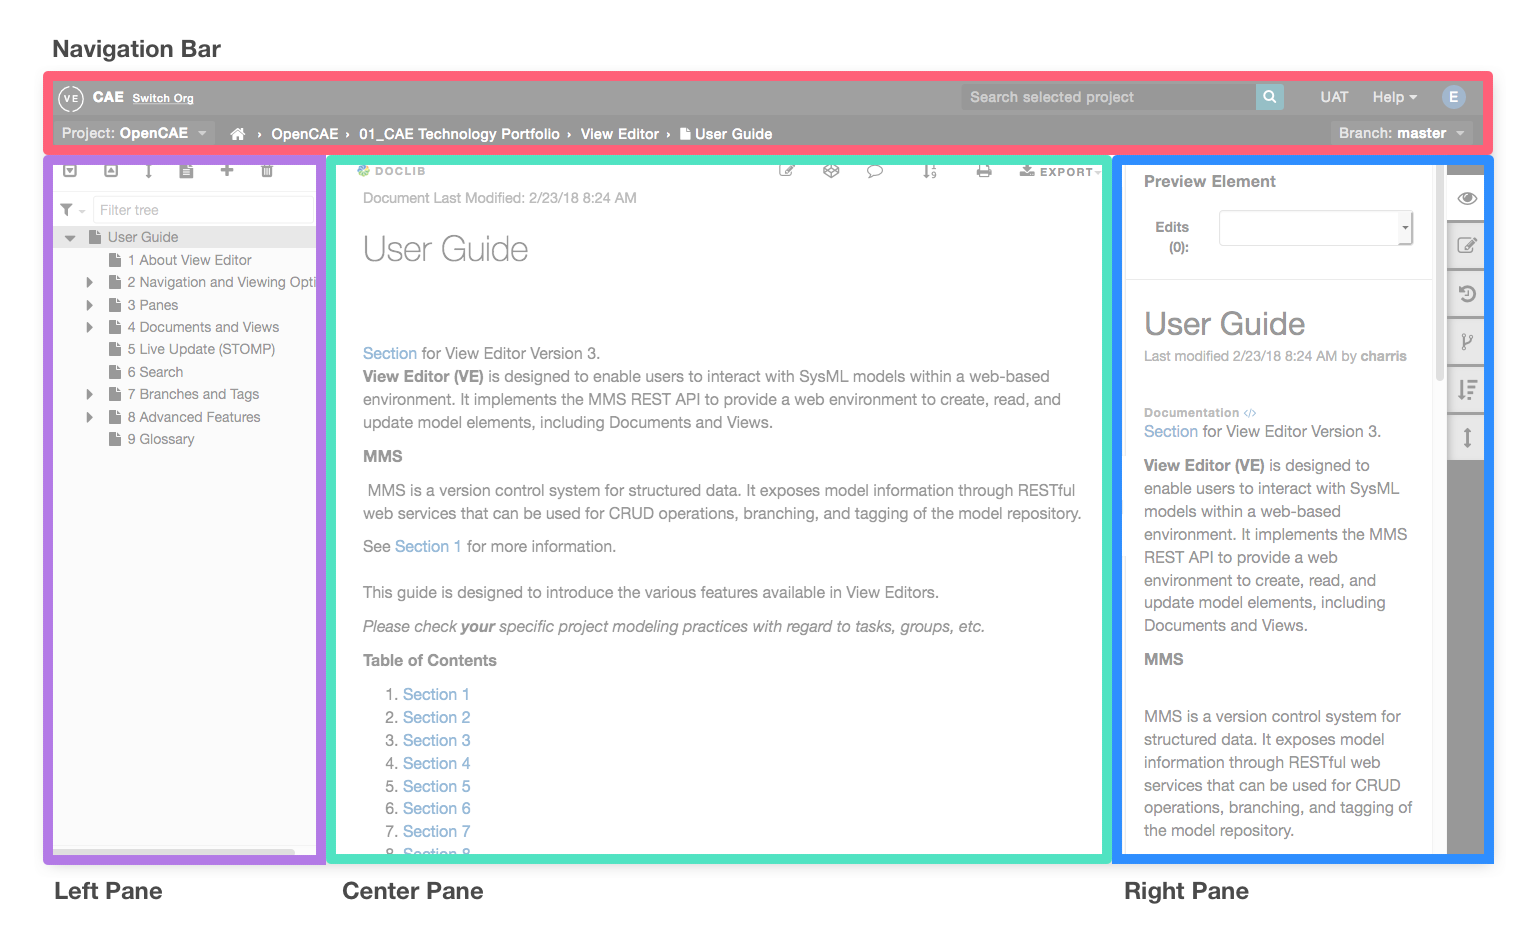
Navigation Bar - Shows context of center pane (current project, branch, etc), allows management of branches and tags and provides global search and helpful links
Left Pane - Shows the project/document hierarchies
Center Pane - Shows Document/View content, provides editing capabilities and export options
Right Pane - Shows detailed information of the selected element, element history and more advanced features of View Editor
Navigation Bar
Top bar
Current org and option to switch
Search for current project and other mounted projects
Provided External Links for View Editor resources
Second bar - current context
First option on the left displays the current project and provides quick access to switch between other projects within selected Org
Breadcrumbs, which is the location of the content in the center pane

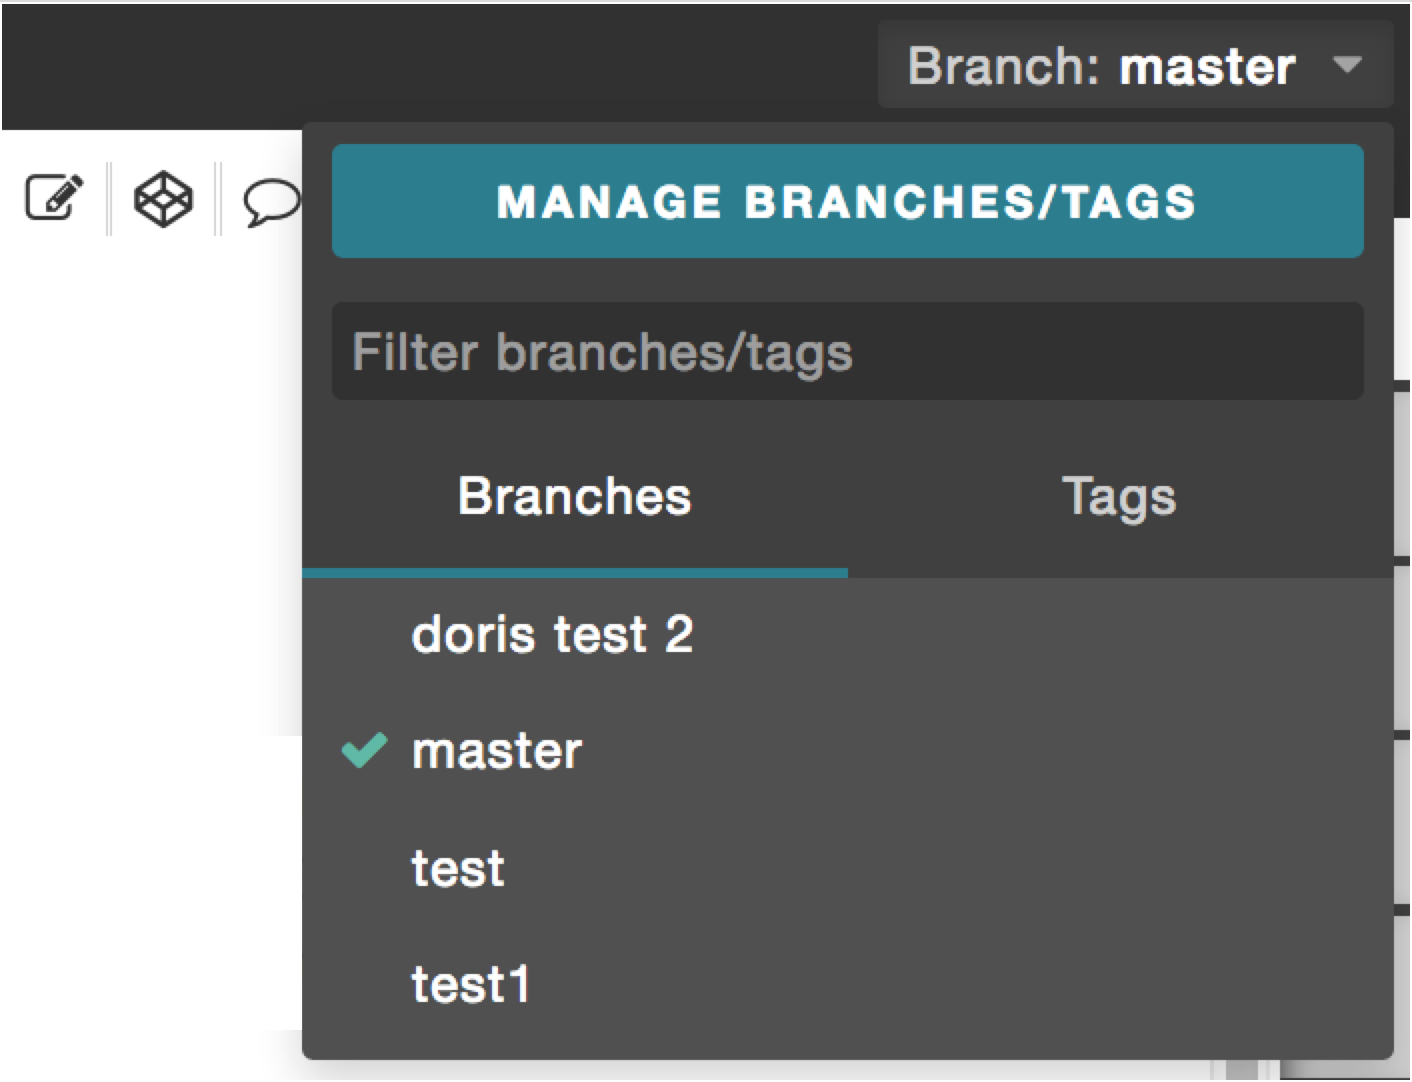
- Current branch/tag and option to switch between other Tasks and Tags
Left Pane
The Left Pane has the following two display modes:
Groups and Documents - Displays the hierarchy of groups and documents when a project is selected. For more information, refer to Navigate To Project and Create/Delete A Document
Document - the view hierarchy of the document when a document is selected
Below are instructions showing how to use the Left Pane’s tools, specifically while in a document
The instruction includes:
Show/Hide Left Pane
Filter
Expand All
Collapse All
View Mode
Reorder views
View full document
Add View
Delete View
Show/Hide Left Pane
The Left Pane can be “docked” or “hidden” in the browser. To
toggle the two states, click on the left pane tab  or drag in
and out the pane.
or drag in
and out the pane.
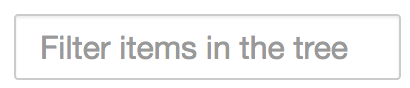
Filtering the tree allows you to see only the desired views based on the name of the view or document
You can then navigate to any of the filtered views. To view the full document again, simply delete anything typed in the filter field. When this is done, all the views in the document show as if the user used the “Expand All” function (see above).

Lets you view all the subviews and sections of views within a document. The user can then individually collapse views as they please.

Lets you collapse all views so that no views are visible in the Left Pane. You can then individually expand views level by level as they please.
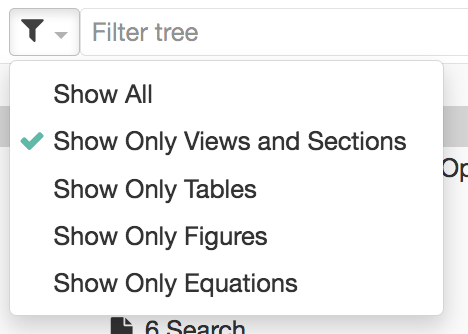
Filter by type 
To filter by different element types, select the filter icon and choose the element type
Reorder views
You can easily reorder the views in the document, refer to Reorder Views/Elements.
This functionality lets you view an entire document in the center pane by “stitching” the views all together
You can either scroll down in the center pane or select a view in the Left Pane to navigate to a certain part of the document
You can edit views when viewing the full document both in the Center Pane and the Right Pane
Depending on the size of the document/views, it may take some time for the document to load.
Steps:
Click “Full Document”

Scroll down slowly through the document to show all content of document
Edit a section while viewing Full Document
Add View
To add a view to an existing document, refer to Add Views.
Delete View
To delete a view from an existing document, refer to Delete Views.
Right Pane
The Right Pane lets you inspect the element that is currently selected.
Note: The Edit Element option will not appear for users who do not have the correct permissions. Consult with your project manager to obtain the correct permissions.
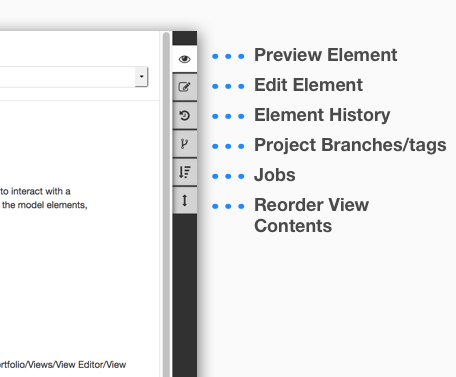
The Right Pane tools are shown on the right and described below with links to more information.
Preview Element: Provides more information about a selected element
Edit and Save Elements: Provides the same editing capabilities as the Center Pane and similar, but not quite the same, saving options
Element History: Lets you inspect an element at different points in time and provides an option to compare different versions
Jobs: Run a document generation job on current document to update any structural content changes from the model
Branches/Tags: Provides a list of existing tags and branches, their time stamps, and a hyperlink to the snapshot of the documents
Reorder View: A user can reorder the Presentation Elements within a View.
Preview Element
“Preview Element” tab displays the following information of the selected element:
Name
Last Modification - What date/time and by whom
Documentation - rendered element documentation.** **clicking on the ‘</>’ icon next to DOCUMENTATION header will toggle the display to show raw html
Metatype - implicitly applied class/stereotype
Location - where the actual element is stored in the associated model in terms of package hierarchy
ID - the unique element ID. If it begins with “MMS”, then it’s a View Editor created element. If it begins with anything else (usually “18_0_…”), it was created in the MagicDraw model
Branch/Tag - The name of the Version (Branch/Tag) that the selected element is currently being viewed on
You may also see element specific information (e.g. value of the properties), depending on the type of element.

Edit and Save Elements
Users can edit elements (refer to Add Presentation Elements) directly from the right pane by selecting an element in the center pane and selecting the Edit Element button. It also provides a Save All ** |image21| option to easily save all current changes. Both the **Preview Element and Edit Element views show a count and dropdown of changes in progress that have not been saved.
Various “Save” options
 - Saves the changes within the editor and closes the
editor or opens next change that has not been saved
- Saves the changes within the editor and closes the
editor or opens next change that has not been saved - Saves changes on the server but the editor remains open
to continue editing the current element
- Saves changes on the server but the editor remains open
to continue editing the current element - Does a bulk save of all changes in progress
Multiple Elements - Failed to Save All
When trying to Save All, the elements may have some conflicts that require more attention before saving.
In this case, the you will see the following error

Note: There is an Auto Save plugin that tracks and stores changes in the browser’s local storage ( See Autosave to the browser’s localStorage )
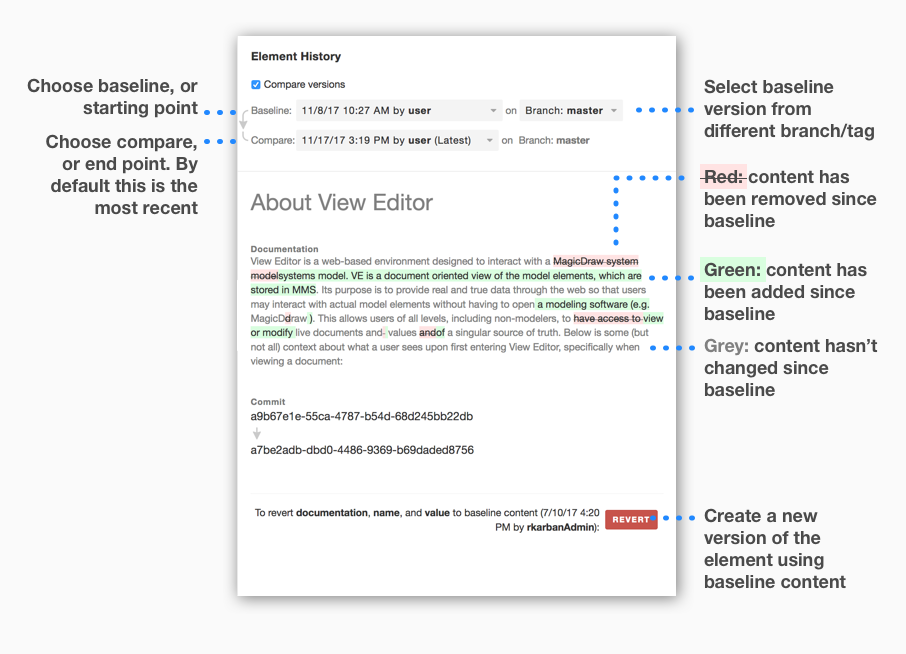
Element History
The Element History tab has a dropdown with a list of element versions. Select a version to display its attributes (same as Preview Element) at that point in time.
By default, this tool shows the element at the latest save point.

To visualize the difference between 2 versions, check “Compare Versions”
Branches/Tags
Branches/Tags can be accessed from the right pane. See Branches and Tags for more information

Center Pane
The Center Pane lets you edit the view contents.
Exceptions:
The Enable Edits
 button will not appear for users who
do not have the correct permissions. Consult with your project to
obtain the correct permissions for editing.
button will not appear for users who
do not have the correct permissions. Consult with your project to
obtain the correct permissions for editing.Cover Pages currently do not have the ability to export to PDF.
The Center Pane tools are shown here and described below from left to right:
Enable Edits
: A user can enable edits in order to
make changes to a view. Refer to Edit A Presentation
Element
for more information. A user must have the collaborator role set in
Alfresco in order to have access to edit.Show Comments
 : Comments are hidden by default.
Refer to Show
Comments/Elements
for more information.
: Comments are hidden by default.
Refer to Show
Comments/Elements
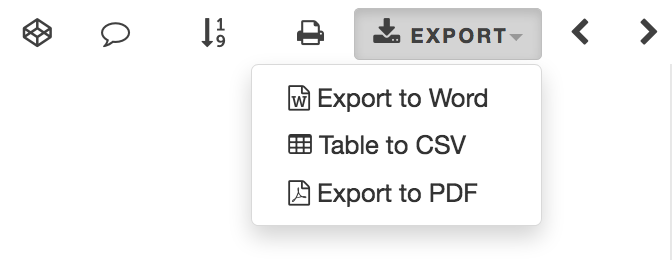
for more information.Export: Refer to “Save As” for more information on the following options:
Print
 : Print a physical copy of a View or
Document
: Print a physical copy of a View or
DocumentSave to Word
 : Save a View or Document as a
local Word Document
: Save a View or Document as a
local Word DocumentTable to CSV
 : Save any and all tables found in
a View or Document as separate CSV files
: Save any and all tables found in
a View or Document as separate CSV filesHTML to PDF :
 Save a View or Document as a PDF file
Show Elements
 : Elements borders are hidden by
default. Refer to Show
Comments/Elements
for more information.
: Elements borders are hidden by
default. Refer to Show
Comments/Elements
for more information.Refresh Figure Numbering
 : Table, Figure, Equation
presentation elements and their references in the center pane will be
updated to include numbering information.
: Table, Figure, Equation
presentation elements and their references in the center pane will be
updated to include numbering information.Navigate Views/Sections: Navigate Through Views for the following options:
Previous
 : Navigate to the previous View
Next
 : Navigate to the next View
ADD Presentation Elements
Add Presentation Elements for more information.